How do you complete the Point Hope Ferryman of the drowned easter egg? With the introduction of Point Hope in the Eventide update, Phasmophobia gains one of its most unique and dynamic maps. Unlocked at level 17, this lighthouse features 10 vertically stacked floors and 13 rooms.
If you’re after more ID cards and badges, then you should check out our other guide for Point Hope next!
What is Phasmophobia’s Ferryman of the Drowned Easter egg
The easter egg in Point Hope is also a complex puzzle. First, you must complete a multi-step puzzle that spans several floors of the lighthouse. The ultimate goal is to uncover the lighthouse’s hidden secret and unlock the Ferryman of the Drowned ID card and badge. There are quite a few steps involved, but the good news is—you don’t need to identify the ghost to complete this Easter egg.
The tasks are the following:
- Throw three balls in sequence at the pool table
- Get the key for the locked cabinet
- Locate and collect the missing gear
- Ring the bell three times
- Read the secret message
- Trigger the Ferryman of the Drowned Easter egg
We recommend setting up a custom difficulty with the weather set to ‘Clear’ so you can get the best view of the Easter Egg. Also, enable the ‘Friendly Ghost’ option, so you won’t have to worry about ghost hunts while you’re out of breath and eight floors up.
Step One — Play Pool

Three paintings of colorful shells hang on the wall — green, blue, and orange. Maybe that’s a clue?
To get started, bring your UV Lamp and head to the fourth floor, where the game room is located.
As you enter, take note of the billiards table and the three paintings of seashells on your right. The order of the shell colors—green, blue, orange—provides a clue. This is the sequence in which you need to throw the matching balls into the pockets on the billiards table.
Walk around to the back to find the pool table. There are many balls on the table, but only three are relevant to the puzzle:
- The green ball with a white stripe
- The blue ball with a white stripe
- The solid, bright orange ball

You must be careful with which ball you pick up and pocket. We recommend standing where I did (see above) and grabbing the ones highlighted. Once you’re in position, throw each ball into any pocket. If you pocket the wrong one, you’ll have to leave the map and start over!
- Grab the green ball (like you would anything else) and throw it into any pocket.
- Grab the blue ball and throw it into any pocket.
- Locate the solid, bright orange ball — ensuring it’s the right one.
- Throw the orange ball into any pocket.
- You should hear a clunk as a secret box opens at the end of the pool table

Grab the key and head upstairs for the next step!
Step Two — Repair the Lantern
Head up the lighthouse until you reach the eighth floor—a room that resembles a workshop. You’ll find a cabinet with red paint spilled on the floor near the workbench, where the Monkey Paw can spawn. On the side, just beneath the brush, is the gear you’ll need for the step upstairs.
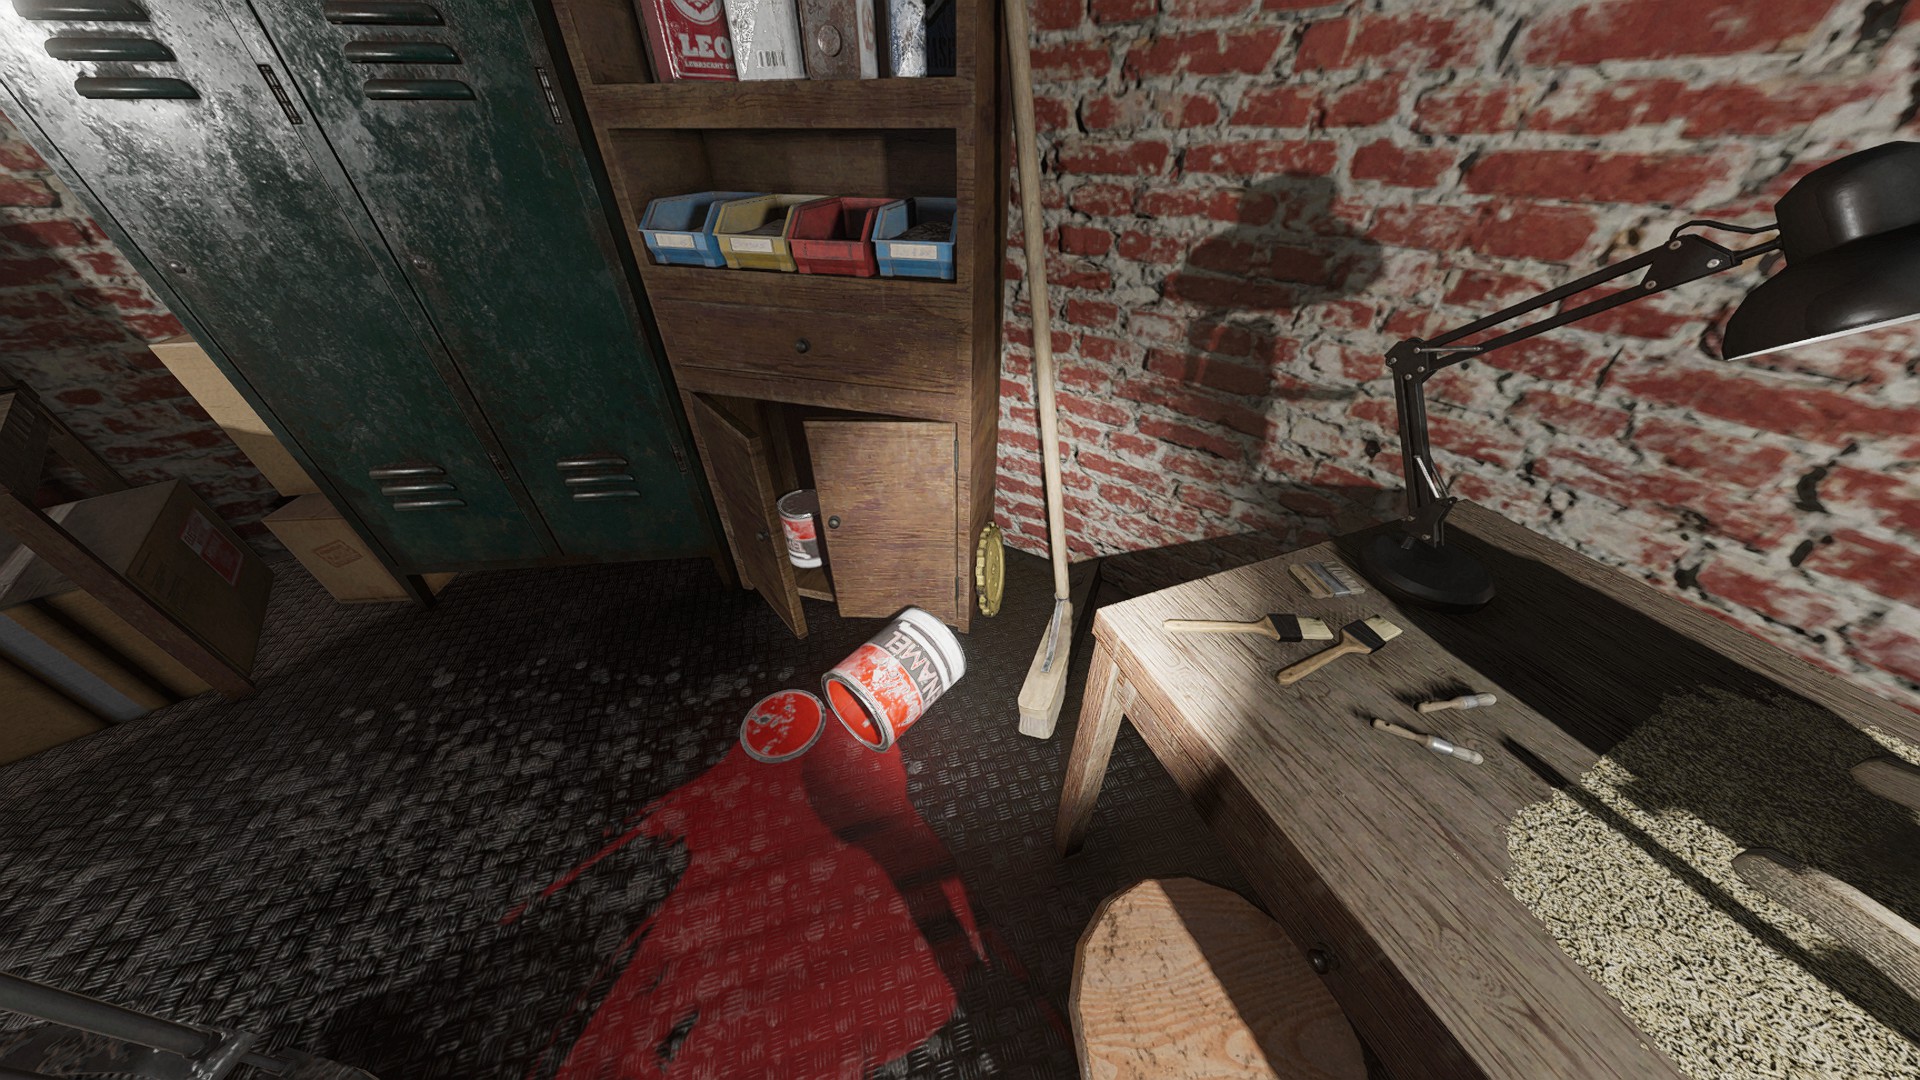
You’ll need this
Once you get the gear, head up the stairs to the ninth floor, turn right, and walk around until you reach the dead end with the locked cabinet.

Use the key from the billiards table to unlock the cabinet. Inside, you’ll notice one gear slot is empty. Interact (default: left-click on PC) to insert the gear into the empty socket. The gears should turn again, followed by three distinct cranking sounds.
Step 3: Ring the Bell

As soon as you’re getting in gear (pun intended) and the actual gears are turning, head back downstairs to the first floor and step outside. You’ll find a large bell between the lighthouse and the van—ring it three times slowly using the interact key (default: left-click on PC). You’ll hear a ‘swoooosh’ audio cue to confirm that the step is complete.
This step is the most finicky. If you don’t hear the audio cue, you may have rung the bell too quickly or too slowly. The best time to interact is when the bell swings back to its resting position—where it would naturally stop if left still. If you do not hear the audio cue, you’ll need to leave the contract and restart the puzzle.
Step Three — Light the Lamp

Unfortunately, the last step involves climbing all the way to the top of Point Hope—ten floors up. Make sure you bring either a Tier II or Tier III flashlight; you’ll need it for the final step.
Tip: A Tier I (UV Stick) will also work, but the UV flashlights make it less finicky!
Once you’re back at the top, go through the door onto the balcony and look into the distance, past the truck and on the beach by a cave. You should see the source of the bell audio cue: a fire illuminating a hint—the letters “UV” written with rocks.

Heading back inside the tower, turn on your UV light and shine it into the lantern until the lantern turns purple and you hear faint whispers. Then, head back outside to see floating green ghosts being revealed wherever the lighthouse lantern illuminates.

Step Four — Claim your Rewards
Once you’re ready, head to the van and return to the lobby. A notification will pop up in the post-contract review, unlocking the badge.
Ferryman of the Drowned ID Badge & Card
The reward for all your hard work—the Ferryman of the Drowned ID badge and card—is a unique, vibrant sea-green design featuring scattered ghostly figures, reminiscent of what you saw throughout Point Hope. The badge also has a subtle, eerie shimmer, giving it a slightly animated effect.
Phasmophobia is available on Steam, PlayStation 5, and Xbox Series X/S. There is also a PSVR 2 version. The Easter Event will be playable across all platforms using crossplay.
For the latest gaming news, follow GameWatcher on BlueSky, check out our videos on YouTube, or give us a like on Facebook. We sometimes include affiliate links in our posts, which grants us a small commission, thank you. Please support independent Games Media. ❤️